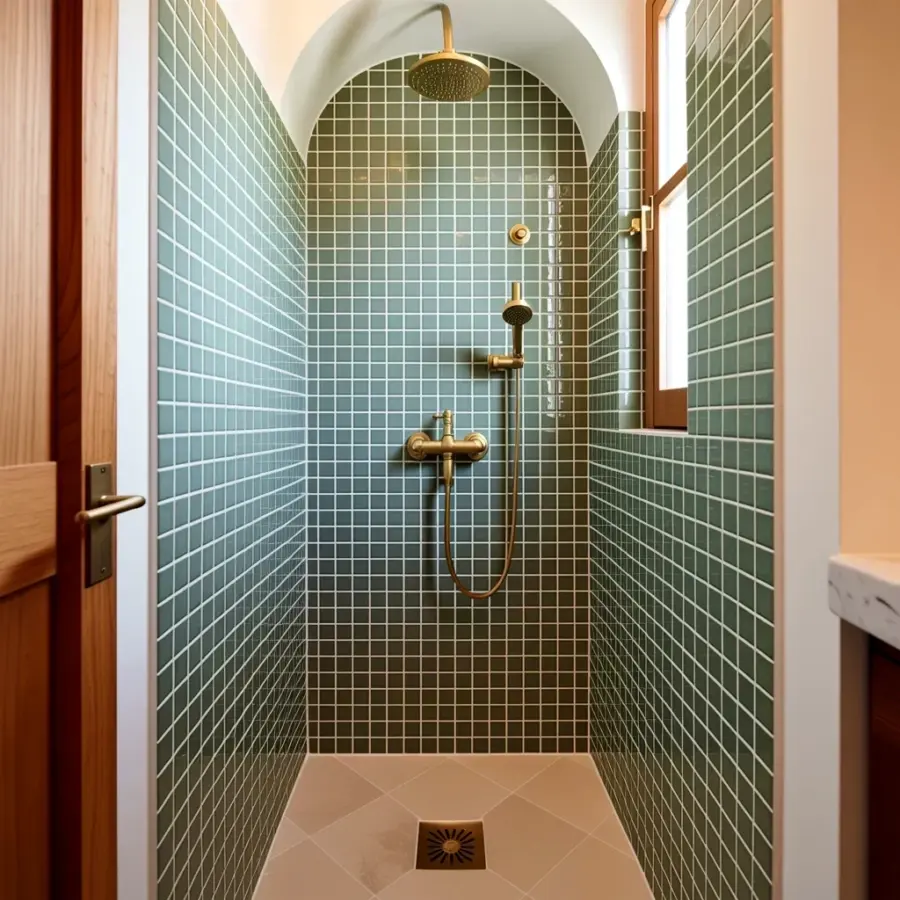
You know that one bathroom tile mistake I see all the time? People grab those tiny mosaic sheets or a super busy pattern because they think it’s cute, and it totally backfires. The space ends up feeling like a cluttered postage stamp instead of a calm retreat. Honestly, it’s one of the easiest errors to fix. The trick is understanding how size and pattern interact with a small room, not just what looks good on a showroom floor. So if you have a tiny bath and you are staring at tile options, let me walk you through the common missteps and how to avoid them. Grab a coffee, maybe a tape measure, and let’s dig in.
Why going too small makes your tiny bath feel chaotic
Here’s the thing: small tiles introduce lots of grout lines. Lots of lines mean visual clutter. In a bathroom that is already short on square footage, your eye has nowhere to rest. I once had a client pick 1×1 inch hexagon mosaics for a 5×7 foot bathroom. It looked like a confused checkerboard. And the cleaning? Nightmare.
A packed pattern with dozens of tiny shapes fights the walls. You want the tile to act like a calm background, not a screaming focal point. A larger tile with fewer grout lines blends surfaces together. It tricks the eye into thinking the room is bigger than it is. That is not genius; that is basic visual psychology.
And look, I get the appeal of those cute penny rounds. But unless your bath is already spacious, they will shrink it down. If you absolutely love a small format, use it sparingly on one accent wall or maybe as a border strip. Not the whole room.
The ideal tile size for a small bathroom (simple math)
Ok so you want a rule of thumb? Pick tiles that are at least 12×12 inches, and honestly, larger if you can. A 12×24 inch tile laid in a running bond pattern is a classic winner. It makes the room feel longer. But don’t go too big either. A 24×48 inch slab in a 4×6 foot bathroom requires careful cuts and can look weirdly out of proportion.
The sweet spot depends on your actual floor area. Measure the smallest wall. If that wall is less than three feet wide, a 6×24 inch plank tile might work better than a square. It keeps the visual length without crowding the room.
And here is a specific personal bit: my own bathroom is 4×6 feet. I once picked a mosaic sheet with sparkly bits before I knew better. Awful. The sparkles caught the light and highlighted every single imperfect grout line. I replaced it with 12×12 matte porcelain and the room instantly felt like a real bathroom instead of a dollhouse.
How to choose a pattern that actually calms the space
A simple pattern is your best friend. Think subway tile in a straight stack, a large-format tile with a subtle marble vein, or a solid color with a slight texture. The pattern should not compete with the fixtures or the mirror. It should support them.
Patterns that involve strong diagonals, large chevrons, or high-contrast mosaic mixes are risky. They demand attention. In a small bathroom, you want the eye to move smoothly around the room, not stick on a dizzying zigzag. If you are set on a geometric pattern, keep it confined to the floor and use a plain tile on the walls. Or vice versa.
Here is a quick list of pattern pitfalls to watch out for:
- Busy herringbone on all walls (too much movement)
- Large-scale floral or abstract motifs (overwhelms the tiny space)
- High-contrast grout with intricate patterns (doubles the visual noise)
- Too many small shapes mixed together (looks like a sample board, not a finished room)
Honestly, if you feel the need to say “wow, what a pattern” when you look at a tile, it is probably too much for a small bathroom. Save that for a powder room with a bold wallpaper moment instead.
Grout color: the hidden culprit that wrecks tile choices
Nobody talks about grout enough. I have seen people pick a gorgeous large-format tile, then use a bright white grout that screams at every seam. The result: the tile size advantage is completely lost. The grout lines become the dominant feature, which is exactly what you do not want.
Match your grout color to your tile. If the tile is medium gray, use a similar gray grout. If it is a cream or beige, go with a slightly darker but still tonal grout. The idea is to make the grout lines disappear, not pop. This way the tile reads as a continuous surface. Instant spaciousness.
One weird thing I have learned: avoid pure white grout unless your tile is also pure white and you clean like a maniac. It shows every speck of dirt and discoloration. A warm off-white or a light gray grout is much more forgiving. And if you are using a dark tile, a darker grout hides dust and makes the floor look intentional.
Three layout hacks that actually save space
You do not have to reinvent the wheel here. Tile layout can do the heavy lifting. First hack: lay floor tiles on a diagonal if the room is narrow. It draws the eye diagonally across the space and makes the floor feel wider. But be warned, it creates more cuts and waste, so buy extra tile.
Second hack: use the same tile on the floor and the shower walls, if you have a shower. That continuity tricks the eye into seeing one big open area rather than two separate small boxes. It is a common trick in hotel bathrooms. Works like a charm.
Third hack: if your ceiling is low, install vertical subway tile (stacked, not offset). The vertical lines pull the eye upward and make the ceiling seem higher. I did this in a friend’s tiny powder room and everyone commented on how tall the room suddenly felt. It is a cheap fix that requires zero structural change.
A real lesson from my own tiny bath reno
Not gonna lie, I made some dumb tile mistakes before I figured this out. My first apartment had a bathroom the size of a closet. I convinced myself that small white hexagon tiles would be timeless and charming. They were not. They looked like a generic 1980s office floor. The grout got dirty in three weeks. I hated it.
When I finally bought my own place, I went with a 12×24 inch matte charcoal tile on the floor and a simple glossy white 4×16 inch subway tile on the walls, stacked straight. No fancy patterns. The grout is light gray, almost matching the tile. The room feels twice as big. And honestly, I never get tired of it. The lesson: resist the tempting patterns and trust the boring stuff. Boring is calm. Calm reads as spacious.
Quick checklist before you buy your tile
Before you hit “add to cart” or drive to the tile store, run through this list. It takes five minutes and saves weeks of regret.
- Measure your smallest wall and floor area. Write the numbers down.
- Choose a tile size that is at least 12×12 for walls, 12×24 for floors if possible.
- Pick a pattern with low visual contrast. One main shape, few colors.
- Match grout to tile color. No bright white unless tile is bright white.
- Buy 10% extra tile for cuts and future repairs. Always, no exceptions.
- Ask the store for a large sample. Tape it to your wall and live with it for a day in different lighting.
The last one is crucial. I ignored it once and ended up with a tile that looked blue in the store but green in my bathroom. Lighting is a liar. See it in your actual room.
Picking tile for a small bathroom doesn’t have to be stressful. Honestly, if you avoid the mistake of going too small or too busy, you are already ahead of half the internet. Larger tiles in a simple pattern, with matching grout and a thoughtful layout, will open up your space and make it feel polished. Next time you scroll through Pinterest for tile ideas, remember this: less chaos, more calm. Save this pin for your next project and when you pick your tile, tag me. I want to see what you choose.
#bathroomtile #bathroomdesign #tiledesign #homerenovation #bathroomideas
Leave a Comment