Why Vertical Tile Layout Works for Small Shower Spaces
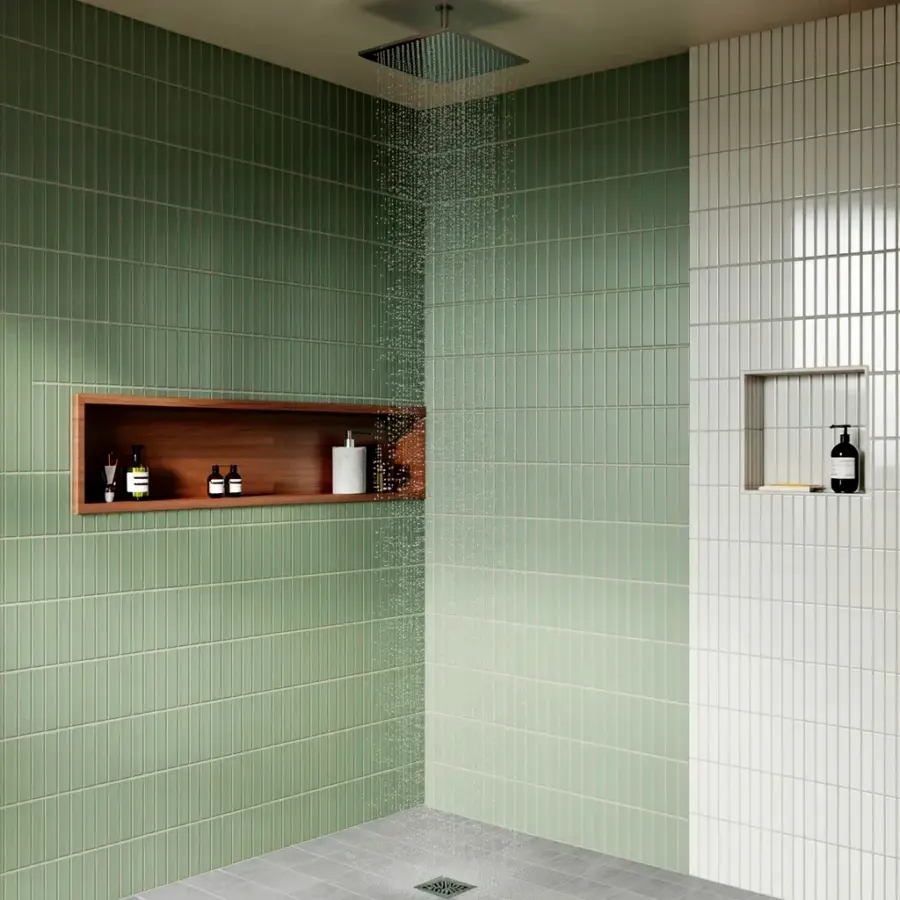
If you are hunting for affordable bathroomtileideas that make a small shower feel bigger, try a vertical stack. The photo that inspired this guide shows sage green tiles arranged in clean, straight lines from floor to ceiling. That upward movement draws your eye higher, tricking the space into feeling taller than it really is.
Vertical placement works especially well in tight alcoves or corner showers. Horizontal tiles tend to widen a room, which is great for narrow bathrooms. But vertical lines add height, and height is what makes a tiny shower feel airy rather than cramped. In the picture, the green tiles run all the way up, stopping only where the ceiling begins. That seamless look removes visual clutter and makes cleaning easier.
A bonus: vertical tiles hide minor imperfections in wall flatness better than horizontal ones. If your walls are slightly wavy (common in older homes), the long vertical gaps draw attention away from small dips.
Choosing the Right Sage Green Tiles Without Breaking the Bank
Sage green is a popular choice for a calm, nature-inspired shower. But you don’t need expensive handmade zellige or artisan subway tile. The tiles in the photo are simple glazed ceramic or porcelain, likely a standard 3×12 inch or 4×12 inch format. Those are widely available at home improvement stores for under $2 per square foot.
When shopping for budget sagegreentiles, look for these practical tips:
- Check the clearance and remnant bins at big box stores. Many sell leftover lots for pennies on the dollar.
- Choose a matte finish instead of glossy. Matte sage green hides water spots and looks more modern, matching the spa vibe.
- Order a few extra tiles (around 10% overage) so you can match dye lots if a tile cracks during installation.
- Consider peel-and-stick tile sheets if you are a renter or want a weekend project. Some brands now offer realistic ceramic-look vinyl in sage green.
In the photo, the tiles have a soft, slightly uneven glaze. You can replicate that look with a standard ceramic tile by choosing one labeled “reactive glaze” or “vintage” finish. Those cost a bit more but still stay under $5 per square foot.
How to Install a Floating Wood Shelf for Shower Storage
The wooden shelf in the picture is a simple floating design, rich brown teak or cedar. It holds a few glass bottles and a white ceramic vessel. This is a smart floating wood shelf shower solution that adds warmth without permanent built-in cabinetry.
Here is how to install one on a budget. First, buy a pre-cut solid wood shelf (teak is best because it resists moisture) from a hardware store. Most are sold as unfinished boards around 12 to 24 inches long. Sand the edges lightly and apply two coats of waterproof sealant or marine varnish. Let it cure for 24 hours.
Next, find the studs in your shower wall using a stud finder. The shelf needs to be anchored into at least one stud, ideally two. If your tiles are already installed, drill through the grout lines (not the tile itself) to avoid cracking. Use stainless steel or brass screws and wall anchors rated for wet areas. Screw a metal shelf bracket or a simple wooden cleat onto the wall, then slide the shelf onto it.
In the photo, the shelf sits flush against the green tile. Keep items minimal: a couple of travel-size shampoo bottles and one vessel. Too many bottles will make the shelf look cluttered and defeat the minimalist spa aim.
The Only Splurge: Selecting a Rainfall Shower Head
The large square rainfall shower head in the photo hangs from the ceiling. That is the one piece in this design worth spending extra on. A good rain shower head provides a wide, gentle spray that mimics standing under a warm waterfall. Cheap round models often have uneven pressure and collect mineral deposits quickly.
When shopping for a rainfall shower head budget option that still feels luxurious, look for these features:
- At least 8 inches in diameter. Square shapes (like the one in the photo) tend to spray more evenly than round.
- Brass or stainless steel construction, not plastic. Plastic breaks sooner in humid bathrooms.
- A swivel joint or adjustable angle. Ceiling-mounted is ideal, but a wall-mounted rain head with a long arm can work too.
- A flow rate of 1.8 to 2.5 gallons per minute. Lower flow saves water without sacrificing coverage.
You can find decent rainfall shower heads for around $60 to $120. That is the biggest single cost in this entire bathroom refresh. The rest of the budget goes to tile, grout, and the wood shelf.
Smart Ways to Recreate the Recessed Niche Look
In the photo, the shower area is separated by a white tiled wall that contains a recessed niche with a black bottle. A built-in niche is convenient, but cutting into existing studs and waterproofing can add hundreds to a renovation. For a budget-friendly approach, use an adhesive niche kit.
You can buy pre-made stainless steel or plastic niches at any home center for around $30 to $50. Cut a hole in the tile backer board, insert the niche, and tile around it. If you are not comfortable cutting into the wall, consider a shallow wire shelf that hangs over the shower pipe. Many affordable shower recessed niche ideas involve using a corner caddy instead of a niche. In this design, the black bottle sits in a small alcove. You can fake that by installing a single floating shelf inside the shower (similar to the wood shelf) and placing a dark bottle there.
Another option: buy a plastic corner shelf with suction cups. It is not permanent, but it holds bottles securely and costs under $15. To match the photo’s clean look, choose a shelf in black or white.
Pairing Tile Colors for a Spa-Like Bathroom Feel
The contrast between sage green tiles and white tile wall creates a calm, spa-like atmosphere. Green is known to reduce stress, and white keeps the space bright. For your own spa bathroom color palette, stick to two or three tones maximum. The photo uses green, white, and natural wood. That is enough.
Avoid mixing too many accent colors. If you want a warm touch, add a wooden bath mat or a woven basket for towels. In the photo, the rich brown wood shelf provides the warmth. The white tile wall acts as a neutral backdrop. Keep grout either white or a very light gray. Dark grout would make the vertical lines too busy and distract from the calm feel.
For flooring, consider a light wood-look porcelain tile or simple white hexagon tile. Both are forgiving with dirt and match the sage green without competing.
Budget Breakdown: Total Cost for This Shower Refresh
A full budget bathroom remodel cost can spiral quickly, but this design stays under control. Here is a realistic estimate for a small shower (roughly 40 square feet of wall tile):
- Sage green ceramic tiles (40 sq ft at $2/sq ft): $80
- White tiles for accent wall (10 sq ft at $1.50/sq ft): $15
- Grout, spacers, and trowel rental: $25
- Floating wood shelf (pre-cut teak board, varnish, screws): $45
- Rainfall shower head (mid-range): $90
- Adhesive niche or corner shelf: $20
- Miscellaneous (paint, caulk, sealant): $30
- Total: $305
Add in labor if you hire a tiler. But if you do the work yourself over a weekend, you can keep the entire project under $400. That is a fraction of what a full shower remodel costs, and the result looks like a serene hotel spa.
The vertical sage green tiles, floating wood shelf, and rainfall shower head are proof that you do not need a huge budget to create a beautiful bathroom. Start with the tile layout, add one nice splurge, and keep everything else simple. That is how you get the look from the photo without the headache of a major renovation.
#bathroomtileideas #sagegreentiles #budgetbathroom #showerremodel #verticaltile
Leave a Comment